

Langfuse Deployment
We host our own instance of LangFuse which you can access here.
This guide details the deployment and configuration of Langfuse (the open-source LLM engineering platform) on AWS ECS (Elastic Container Service).
To streamline the setup and avoid manual environment variable drift, we maintain a pre-configured task definition. You do not need to create a task definition from scratch; instead, you can leverage the existing definition and focus on deploying the supporting storage resources, launching the service, and wiring up DNS and Load Balancing.
Architectural & Sidecar Design
To keep network overhead, latency, and costs to a minimum, Langfuse is deployed utilizing a single-task multi-container sidecar architecture:
[ ECS Task Definition: esp-langfuse ]
┌─────────────────────────────────────────────────────────────────────────┐
│  ┌────────────────────────────┐          ┌────────────────────────────┐ │
│  │      esp-langfuse-web      │          │    esp-langfuse-worker     │ │
│  │        (Port 3020)         │          │         (Sidecar)          │ │
│  └─────────────┬──────────────┘          └─────────────┬──────────────┘ │
│                │                                       │                │
│                └──────────► localhost (awsvpc) ◄───────┘                │
│                                   ▲                                     │
│                ┌──────────────────┴──────────────────┐                  │
│                ▼                                     ▼                  │
│  ┌────────────────────────────┐          ┌────────────────────────────┐ │
│  │  esp-langfuse-clickhouse   │          │     esp-langfuse-redis     │ │
│  │         (Sidecar)          │          │         (Sidecar)          │ │
│  └─────────────┬──────────────┘          └────────────────────────────┘ │
│                │                                                        │
└────────────────┼────────────────────────────────────────────────────────┘
                 ▼
       [ AWS EFS Volume ] (esp-langfuse-clickhouse-efs)
- Single Task Footprint: The core services (
esp-langfuse-web,esp-langfuse-worker), the clickhouse analytics DB (esp-langfuse-clickhouse), and the transient cache queue (esp-langfuse-redis) are bundled in the same task definition (esp-langfuse). - Localhost Networking: Because Fargate runs these sidecars within the same
awsvpcnetwork namespace, the containers communicate with each other overlocalhost(e.g., Langfuse connects to Redis vialocalhost:6379and ClickHouse viahttp://localhost:8123). - ALB Target Integration: The Application Load Balancer (ALB) specifically routes traffic only to the
esp-langfuse-webcontainer on port3020.
Part 1: Storage Provisioning (S3 & EFS)
Langfuse requires dual storage backends: S3 for raw trace/LLM payload uploads, and a persistent filesystem (EFS) for the ClickHouse container which powers high-speed analytics.
1. AWS S3 Bucket Setup (Trace Offloading)
- Create a private, dedicated S3 bucket:
esp-langfuse. - Permissions: Block all public access.
- IAM Policy: Ensure the ECS task execution role (attached to the
esp-langfusetask definition) has read, write, and list permissions on this bucket.
2. AWS EFS Setup (ClickHouse Persistence)
Because AWS Fargate is serverless and stateless, any files written directly to the ClickHouse container's default filesystem will be lost upon task restarts. We mount an AWS Elastic File System (EFS) volume to ensure persistent storage of analytics data.
- Create EFS File System:
- Go to the Amazon EFS Console.
- Click Create file system.
- Name it
esp-langfuse-clickhouse-efs. - Select our application VPC (e.g.,
esp-london).
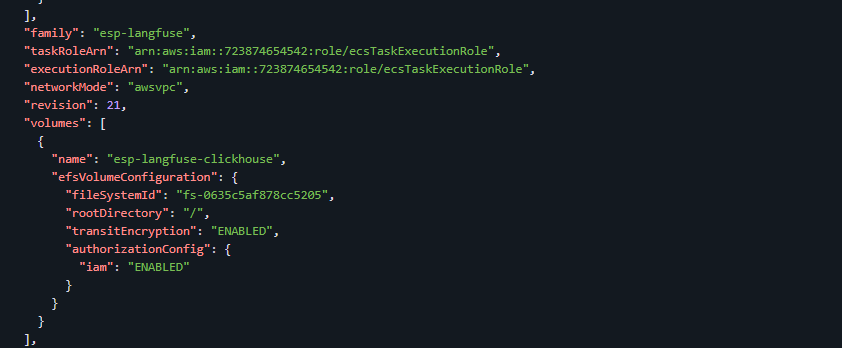
(The volume mounting configuration is fully handled by our Task Definition, but verify the following if recreating the file system):
- Configure Networking (Mount Targets):
- EFS must be accessible from Fargate. Ensure that EFS Mount Targets are configured in the same private subnets as your ECS services.
- Security Group: Assign a security group to the EFS mount targets that allows inbound NFS traffic (TCP Port
2049) from the ECS task security group.
- Create EFS Access Point (Recommended):
- Under the created file system, navigate to the Access Points tab and click Create access point.
- Set Path to
/var/lib/clickhouse. - Set the User ID and Group ID to
101(typical ClickHouse container user) to prevent permission collisions. - This is specified in the task definition under the ClickHouse container's mount points:
{
  "mountPoints": [
    {
      "sourceVolume": "esp-langfuse-clickhouse",
      "containerPath": "/var/lib/clickhouse",
      "readOnly": false
    }
  ]
}
Part 2: ECS Service Configuration
With storage configured, launch the service using our existing task definition.
- Navigate to the AWS ECS Console and select the
esp-infrastructurecluster. - Under the Services tab, click Create.
- Deployment Configuration:
- Application Type:
Service. - Family: Select
esp-langfuse. - Revision: Select the latest revision (referencing the esp-langfuse Task Definition).
- Service Name:
esp-langfuse. - Desired Tasks:
1(Must remain at1due to ClickHouse single-instance file locking over EFS).
- Application Type:
esp-langfuse-clickhouse container is still online and actively holding the EFS lock, the new task fails to boot and acquire the file lock, causing the entire deployment to fail.To resolve this issue, configure the Deployment Options in ECS exactly as follows:- Minimum healthy percent:
0 - Maximum percent:
100
- Volume Mounting:
- During the service creation wizard (or when updating the service), map the EFS volume
esp-langfuse-clickhouse-datato the ClickHouse container path/var/lib/clickhouse.
- During the service creation wizard (or when updating the service), map the EFS volume
- Network Configuration:
- Subnets: Select our private subnets.
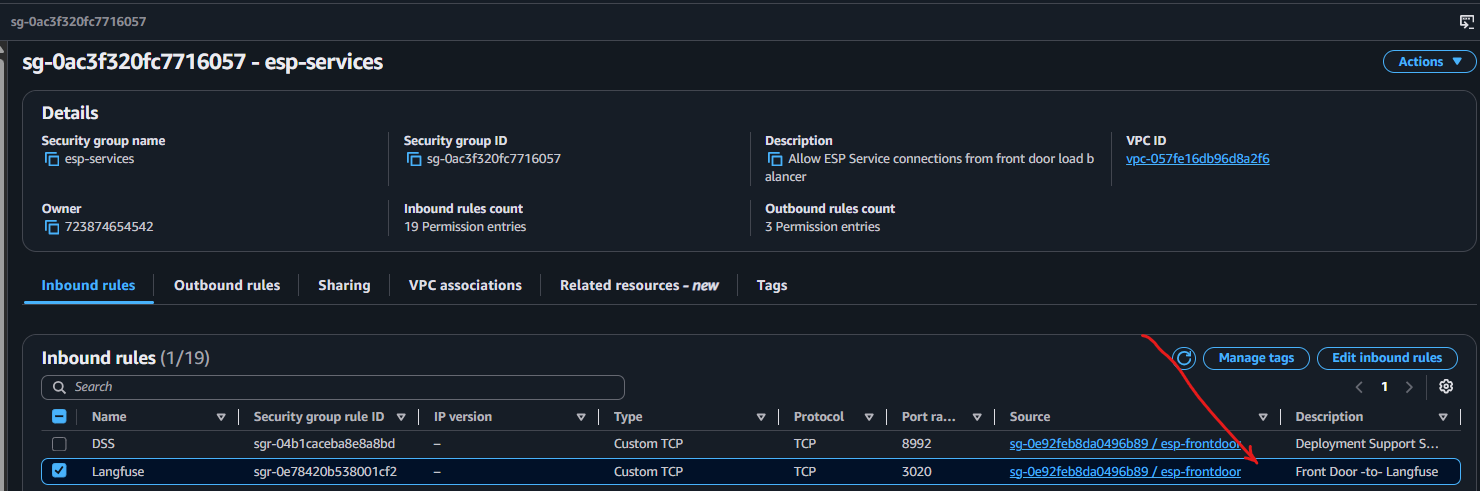
- Security Group: Select the existing security group
esp-serviceswhich:- Permits inbound TCP traffic on port
3020(esp-langfuse-webUI/API) only from the AWS ALB Security Group (esp-frontdoor). - Permits outbound traffic to PostgreSQL (
5432), EFS (2049), and the public internet (for S3 and Cloudflare interaction).
- Permits inbound TCP traffic on port
Part 3: Application Load Balancer (ALB) Setup
To expose Langfuse to the internet safely, configure a target group and route traffic through our existing production ALB.
1. Create Target Group
- Target Type:
IP(Fargate tasks register by IP). - Protocol:
HTTP - Port:
3020(Targets the web container interface) - VPC: Select the application VPC.
- Health Checks:
- Protocol:
HTTP - Path:
/api/public/health(Note: This is Langfuse's default public health endpoint; do not use/to avoid hitting authentication redirects). - Healthy Threshold:
2 - Unhealthy Threshold:
5 - Timeout:
5 seconds - Interval:
30 seconds - Success Codes:
200
- Protocol:
2. Configure ALB Listener Rule
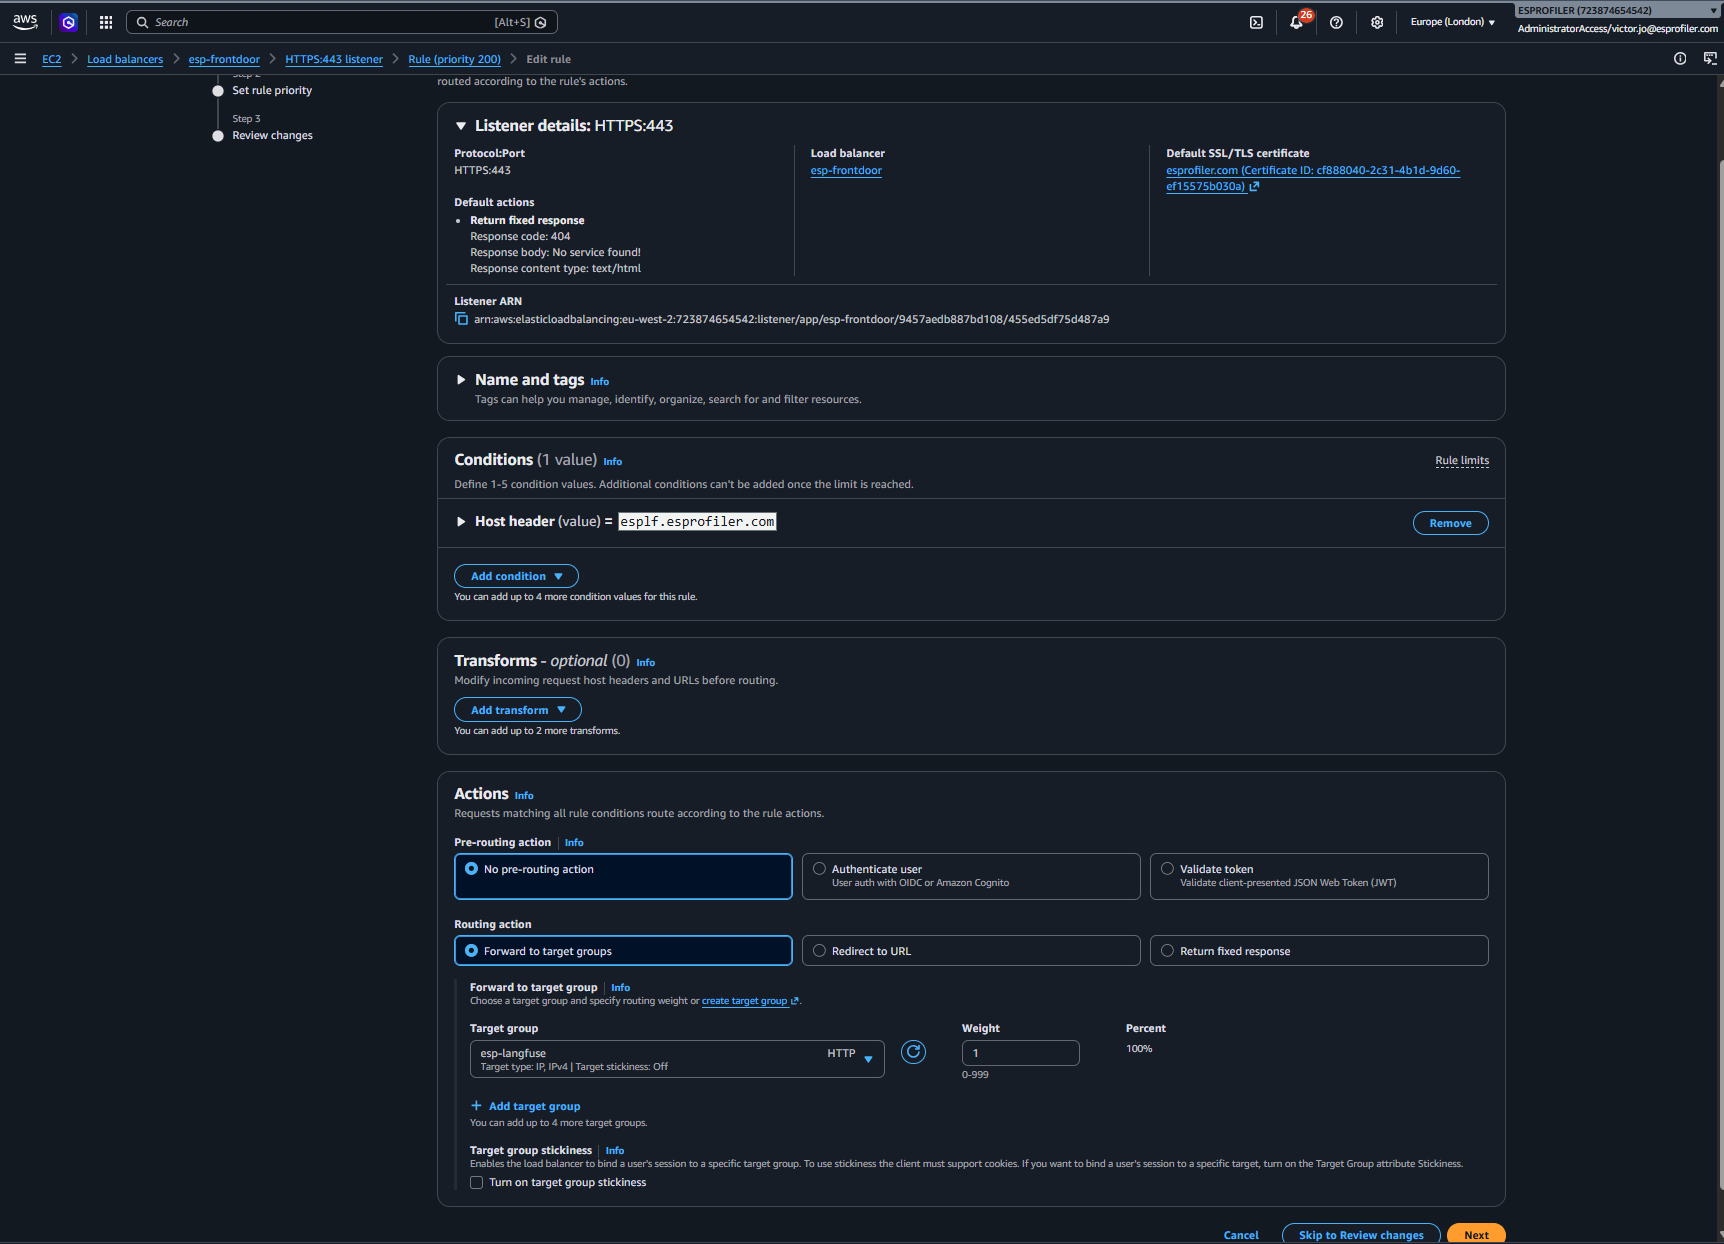
Navigate to your EC2 Application Load Balancer Listener for Port 443 (HTTPS).
- Add a New Rule.
- Conditions:
- Host Header:
esplf.esprofiler.com
- Host Header:
- Actions:
- Forward to: Select the Target Group created above.
- Priority: Set an appropriate rule priority index (Currently set to
200).
Part 4: Cloudflare DNS Setup
We manage our domain zones through Cloudflare. Map the public address to the AWS ALB.
- Log in to the Cloudflare Dashboard and select the
esprofiler.comdomain zone. - Navigate to DNS > Records.
- Click Add Record:
- Type:
CNAME - Name:
esplf(resulting inesplf.esprofiler.com) - Target: Enter the public DNS name of your Application Load Balancer (e.g.,
esp-prod-alb-123456789.eu-west-2.elb.amazonaws.com). - Proxy Status:
Proxied(orange cloud enabled for DDoS protection and SSL edge offloading).
- Type:
- Save the record.
Part 5: SSO & Authentication Configuration
In production, local credential logins should be disabled in favor of Single Sign-On (SSO). The task definition is pre-configured for Google Cloud OAuth SSO.
To complete the SSO setup:
- Register a new OAuth Client ID in the Google Cloud Console > APIs & Services > Credentials.
- Authorized Redirect URIs: Configure the redirect URI pointing to:
https://esplf.esprofiler.com/api/auth/callback/google - Copy the generated Client ID and Client Secret.
- Securely upload them to the AWS Secrets Manager/Parameter Store variables injected by the task definition:
AUTH_GOOGLE_CLIENT_IDAUTH_GOOGLE_CLIENT_SECRET
- Ensure
AUTH_DISABLE_USERNAME_PASSWORD="true"is injected into the environment to enforce SSO login. - For more advanced settings, consult the Langfuse SSO (Google) documentation.
Part 6: Verification & Troubleshooting
Once the service is successfully deployed, verify the installation:
Verification Steps
- Navigate to your configured domain (
https://esplf.esprofiler.com). - Verify that the browser establishes a secure connection with a Cloudflare SSL certificate.
- Select your configured Google SSO button to log in.
- Create a test project, generate an API key, and run a quick python script to confirm trace ingestion:
from langfuse import Langfuse

langfuse = Langfuse(
    public_key="pk-lf-...",
    secret_key="sk-lf-...",
    host="https://esplf.esprofiler.com"
)

# Ingest a mock trace
trace = langfuse.trace(name="Deployment Verification")
trace.generation(name="Test Generation", output="Success")
langfuse.flush()
print("Trace uploaded successfully!")
Troubleshooting Common Issues
- ALB returns 502 Bad Gateway:
- Ensure the ECS security group (
esp-services) permits inbound traffic on port3020from the ALB security group (esp-frontdoor). - Verify that the target group is hitting the correct health check path (
/api/public/health). - Check the ECS task logs to see if the web container is crashing on startup.
- Ensure the ECS security group (
- EFS Mount Failures (Task Stuck in PENDING/ACTIVATING):
- Verify that the EFS Security Group permits inbound traffic on port
2049(NFS) from the ECS task security group (esp-services). - Double-check that EFS Mount Targets are active in all subnets selected for the ECS Service.
- Verify that the EFS Security Group permits inbound traffic on port
- Database Connection Failures:
- Ensure the RDS database Security Group has an inbound rule allowing TCP
5432from the ECS Task Security Group.
- Ensure the RDS database Security Group has an inbound rule allowing TCP
- NextAuth Redirection Loop:
- Verify that
NEXTAUTH_URLis set to the exact public HTTPS domain (https://esplf.esprofiler.com) in AWS Secrets Manager / Parameter Store.
- Verify that
Capability Exchange
Guide on how to update the production environment for the Capability Exchange
ESP Platform Configuration
Comprehensive deployment and configuration guide for the esp-platform application.yml, covering tenant-specific customization, environment profiles, database connections, central services, AI/LLM observability, and ECS variables.