Development Setup
The majority of the required software downloads can be found on the ESP Google Drive in Software Programming Downloads which should be already be installed accessible on your machine via G: virtual drive, should you have issues downloading software directly from the internet due to permission restrictions.
Do not use the Google Drive web interface to download software.
G: virtual drive directory, Copy to your local machine first and install from there.Folder location:
G:/Shared drives/ESP Common/Onboarding/Software/Programing
Prerequisites
Before you begin, please ensure you have the following relevant software installed and configurations set up on your computer:
Common Prerequisites
Git is required for source control across all ESP projects.
Why use Windows Package Manager (winget)?
The Windows Package Manager (winget) — available via the Microsoft Store — is the recommended way to install and maintain Git on Windows. It keeps Git up to date automatically alongside your other managed packages, and avoids the need to manually download installers.
wingetis pre-installed on Windows 11 and available on Windows 10 (build 1709+) via the App Installer package in the Microsoft Store.
Install Git
Open PowerShell or Windows Terminal and run:
winget install --id Git.Git -e --source winget
This installs the latest stable release of Git, including Git Bash and Git GUI.
Verify the installation
After installation, restart your terminal, then confirm Git is available:
git --version
You should see output like git version 2.x.x.windows.x.
Keeping Git up to date
To update Git (and all other winget-managed packages) at any time:
winget upgrade --id Git.Git
Or update everything in one command:
winget upgrade --all
First-time configuration
After installing, set your identity so commits are correctly attributed:
git config --global user.name "Your Name"
git config --global user.email "your.email@esprofiler.com"
Confirm your global config is correct:
git config --global --list
Docker Desktop is required to run containerised services locally, including the ESP platform and its supporting infrastructure.
Prerequisites
Docker Desktop on Windows uses the WSL 2 (Windows Subsystem for Linux 2) backend. Before installing, ensure WSL 2 is enabled:
wsl --install
wsl --set-default-version 2
Restart your machine after this step if prompted.
Install Docker Desktop
The recommended way to install Docker Desktop is via Windows Package Manager (winget):
winget install --id Docker.DockerDesktop -e --source winget
Alternatively, download the installer directly from docs.docker.com/desktop/install/windows-install.
After installation, launch Docker Desktop from the Start menu and complete the initial setup wizard. Accept the licence agreement and ensure Use WSL 2 instead of Hyper-V is selected.
Verify the installation
Once Docker Desktop is running (the whale icon appears in the system tray), open a terminal and confirm:
docker --version
docker compose version
You should see version output for both. Run a quick smoke test:
docker run --rm hello-world
Keeping Docker Desktop up to date
Docker Desktop notifies you in-app when updates are available. You can also update via winget:
winget upgrade --id Docker.DockerDesktop
Increasing Memory Allocation
By default, WSL 2 may claim too much — or too little — host memory. For ESP local development, it is recommended to allocate at least 6–8 GB of RAM to WSL 2.
Create or edit the file C:\Users\<YourUsername>\.wslconfig:
[wsl2]
memory=16GB       # Maximum RAM allocated to WSL 2 (adjust to suit your machine)
processors=4     # Number of CPU cores (optional)
swap=2GB         # Swap space (optional)
Tip: A safe value is half your total physical RAM. For example, on a 16 GB machine, set
memory=8GB.
After saving the file, restart WSL 2 for the change to take effect:
wsl --shutdown
Then reopen Docker Desktop — it will reconnect to the updated WSL 2 instance automatically.
You can verify the memory available inside WSL 2 with:
wsl -- free -h
Python is required for tooling and scripting used across ESP projects.
Install Python via winget
The recommended way to install Python on Windows is via Windows Package Manager (winget), which keeps it up to date alongside your other packages:
winget install --id Python.Python.3 -e --source winget
This installs the latest stable Python 3 release from the official python.org channel, including pip and the Python Launcher (
py).
Alternatively, download the installer from python.org/downloads. If using the manual installer, ensure Add Python to PATH is checked before clicking Install.
Verify the installation
Restart your terminal after installation, then confirm Python and pip are available:
python --version
pip --version
You should see output like Python 3.x.x and pip x.x.x.
On Windows,
py(the Python Launcher) is also available and is the preferred way to run Python scripts when multiple versions are installed:py --version
Keeping Python up to date
winget upgrade --id Python.Python.3
Virtual Environments
Always use a virtual environment to isolate project dependencies. In the project root:
# Create a virtual environment
python -m venv .venv

# Activate it (PowerShell)
.\.venv\Scripts\Activate.ps1

# Activate it (Command Prompt)
.\.venv\Scripts\activate.bat
Your terminal prompt will change to show (.venv) when active. Install dependencies into the environment with:
pip install -r requirements.txt
Deactivate when done:
deactivate
Note: If you see a PowerShell execution policy error when activating, run:
Set-ExecutionPolicy -ExecutionPolicy RemoteSigned -Scope CurrentUser
Backend Prerequisites
Backend projects all run Java 25+ specifically we use GraalVM, a high-performance, polyglot virtual machine and Java Development Kit (JDK). This polyglot engine is what allows our Java code to natively run JS in things like discovery transforms.
Installing GraalVM (JDK - Java Development Kit )
- Grab the latest version of GraalVM from "G:\Shared drives\ESP Common\Onboarding\Software\Software Development Kits".
- Create a Java folder on your C drive "C:\Java" and extract the contents of the GraalVM runtime there.
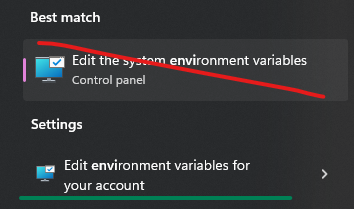
- In the windows start menu type "environment variables" open the environment variables for your account (not the system one)
- Edit the path in the top box and add the bin folder of GraalVM e.g. "C:\Java\graalvm-jdk-25.0.3+9.1\bin"
- Add a new environment variable called 'JAVA_HOME' and set the value of this to the GraalVM folder (not the bin file) e.g. "C:\Java\graalvm-jdk-25.0.3+9.1"
- Open a CMD terminal (type cmd in the start menu) type "java -version", you should now see the GraalVm version. If not check the path you added is correct, close terminal and repeat.
Running a backend project from CMD
All backend projects are Spring Boot based, we follow a pattern of having a dev profile for each project that is used to configure properties and runtime settings for local development.
From within each backend project folder you can open a CMD in the project root and run the following command to compile and start the application in dev mode:
.\mvnw.cmd spring-boot:run -Dspring-boot.run.profiles=dev
Frontend Prerequisites
Downloading NodeJS
Download the LTS Windows x64 Standalone Binary (.ZIP) package from Prebuilt Binaries

Installing NodeJS
- Navigate to your user applications folder by pasting the following alias into your File Explorer address bar:
%userprofile% - Then create the following folder tree
Applications/nodejs - Extract the ZIP file contents into the
nodejsfolder.
You should have a path to the node executable file as follows:
../Applications/nodejs/node.exe
System Configuration
- Press Windows key and search for “Environment Variables”, there will be two search results.
- Click on “Edit environment variables for your account”
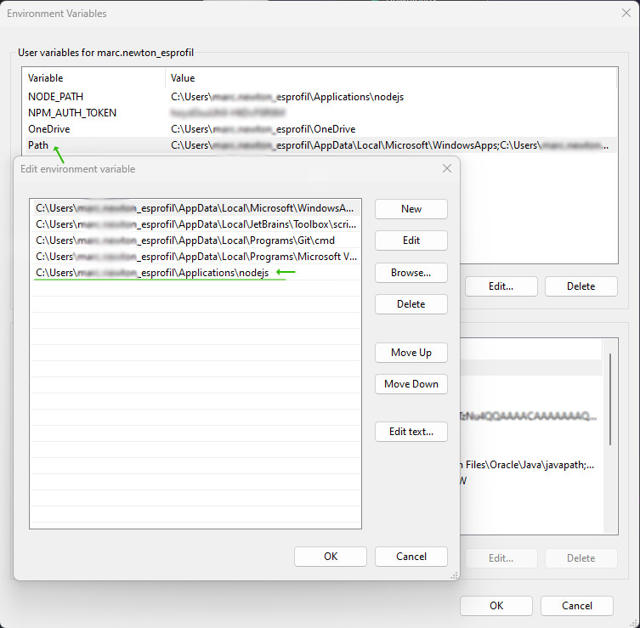
- Add the installation location of NodeJS to the User Paths location.
Once the installation location of NodeJS has been added to user paths, check it is installed correctly by opening a new terminal and running:
node -v
ESP projects consume private packages hosted on the GitHub Package Registry under the @esprofiler scope. To install these packages locally (via yarn install or npm install), your machine must have a GitHub Classic Personal Access Token (PAT) configured as an environment variable.
Without this token, package installation will fail with a 403 Forbidden error.
Step 1: Create a Classic Personal Access Token
Follow the Personal Access Token guide to create a Classic token with the following scopes:
| Scope | Purpose |
|---|---|
read:packages | Download packages from GitHub Package Registry |
repo | Required — ESP packages live in private repositories |
Classic tokens only — fine-grained tokens are not supported by the GitHub Package Registry. See the PAT guide for detail on why.
Copy the token value immediately after creation — GitHub will not show it again.
Step 2: Add NODE_AUTH_TOKEN to your User Environment Variables
Projects are configured to read your token from the NODE_AUTH_TOKEN environment variable. This must be set at the user account level — not at the system level, as that requires administrator access.
On Windows 11:
- Press the Windows key and type
environment variables - Two results will appear — click "Edit environment variables for your account"
- In the "User variables for <your username>" section (the top panel), click New...
- Fill in the following:
- Variable name:
NODE_AUTH_TOKEN - Variable value: (paste your Classic token here)
- Click OK to save, then OK again to close the window.
Step 3: Verify the token is available
Open a new PowerShell or terminal window and run:
echo $env:NODE_AUTH_TOKEN
Your token value should be printed. If the output is blank, ensure you fully closed and reopened the terminal after saving.
Step 4: Test package installation
Navigate to a project that uses @esprofiler packages and run:
yarn install
If the token is correctly set, packages will download without a 403 error.
Enable Yarn by running the following command in terminal:
corepack install -g yarn@stable
Check yarn has been enabled and version 4+ is output:
yarn -v
This should print out version 4+ and enable you to follow online setup guides for newer versions of Yarn.
Getting Started: Cloning the Repository
To get started, you must first clone the infra-devenv-pro repository from GitHub. This repository contains the management tool and all the necessary configuration files.
Ensure you clone the repository into
C\Users\<your-username>\development.
Open a terminal or command prompt and run the following command:
git clone https://github.com/ES-Profiler/infra-devenv-pro.git
This will create a new folder named infra-devenv-pro on your machine.
Running the Manager
Open the File Explorer and navigate into the cloned repository folder. To launch the tool, simply double-click and run the esprofiler-dev.bat file.
This will open a command-line interface, install the necessary dependencies and present you with a menu of options.
Main Menu Features
The manager provides several options to help you manage your development environment.
Onboarding Wizard
What it is: This is the first step for any new user. The wizard sets up your entire development environment based on the type of work you do. When to use it: Run this the very first time you use the tool.
The wizard will ask you to select a Profile:
- Frontend Only: If you only work on user interfaces (like the Platform SPA or Account Portal), choose this. It will clone only the frontend-related code repositories to your computer. The backend services will run automatically in Docker.
- Backend Only: If you only work on APIs and server-side logic, choose this. It will clone only the backend-related code repositories. The frontend services will run automatically in Docker.
- Fullstack: If you work on both frontend and backend code, this option is for you. It clones all necessary code repositories and runs other infrastructure services (like databases) in Docker.
- Q&A: This profile is for team members who need to run the entire application for testing but do not need to edit the code. It WILL NOT clone any code repositories; instead, it runs all services (both frontend and backend) inside Docker.
After you select a profile, the wizard will clone the relevant repositories into a development folder located in your user's home directory (e.g., C:\Users\YourName\development).
Configure Environment
What it is: This option lets you change your setup after the initial onboarding. When to use it: Use this if you need to switch profiles or use a specific version of a service.
You can perform two main actions here:
- Change Profile: You can switch between the profiles described above (
Frontend,Backend,Fullstack,Q&A) at any time. - Override Container Tags: For any service that runs in Docker (i.e., the parts of the application you are not developing locally), you can specify a version. The default is
latest, but you might want to use a specific version for testing, for example,feature-branch-name. This gives you fine-grained control over your environment. Not, if a branch has a/in it, then this will be changed to a-in the image name, e.g.improvement/my-improvementwill be available asimprovement-my-improvement
Update/Rebuild
What it is: This option updates both the management tool and your running Docker services. When to use it: Run this periodically to ensure you have the latest code and features.
This action does two things:
- Pulls the latest changes for the
infra-devenv-protool itself. - Rebuilds all the Docker containers, pulling the newest available images for all services. This ensures your environment is up-to-date.
Import Volume
What it is: A "volume" is where Docker stores persistent data, like a database. This option lets you load pre-packaged data into your environment. When to use it: Use this when you need a specific dataset for testing, such as an empty database, a partially filled one, or a large, production-like one.
You will be asked to choose a volume (e.g., esp-database-8 for the main database) and then a "tag" for the data you want to import:
empty: A clean slate.partial: A small amount of sample data.heavy: A large dataset for more comprehensive testing.
Export Volume
What it is: This is the reverse of importing. It packages your local data volume into a shareable image. When to use it: Use this if you have created a specific data setup (e.g., for a bug reproduction or a new feature) that you want to share with other team members. You will be prompted to give your export a "tag" (name).
Start/Stop Environment
- Start Environment: Starts all the Docker containers associated with your currently configured profile.
- Stop Environment: Shuts down all running services.
Reset Config
What it is: This deletes your local configuration (config.json and .env).
When to use it: Use this only if your configuration is broken and you want to start over from scratch. After resetting, you will need to run the Onboarding Wizard again.
Local Login Credentials
How to log in to ESP Platform, Account Portal and Vendor Portal.
A local development environment login account is available for all the front-end app services:
Username: user@esprofiler.com
Password: ESProfiler@123
Overriding Projects
it is possible to toggle off individual repositories/projects and run them locally, rather than through Docker. To do this, you can open Docker Desktop and "stop" the relevant project. Then, git clone and run the respective project locally. This will allow you to make changes to that particular project in development, without needing to git clone every other project in that stack (e.g. all front-end or back-end projects)
Example: Overriding Front-End
For example, if you want to make changes to just the frontend repository for testing or development, you can run the frontend locally by disabling the platform-frontend docker image. This is just an alternative way to quickly switch between PR and feature branches without needing to retag images.
- Pull down the
platform-frontendrepository. - Checkout the branch you wish to try local changes with.
- Run
yarn installto get the latest packages - Ensure the
esp-dev-envcontainer is running (if you haven't done this follow the steps for onboarding above) but stop theplatform-frontendimage. When running this exposes port9990whereas we want to expose this from our local repo.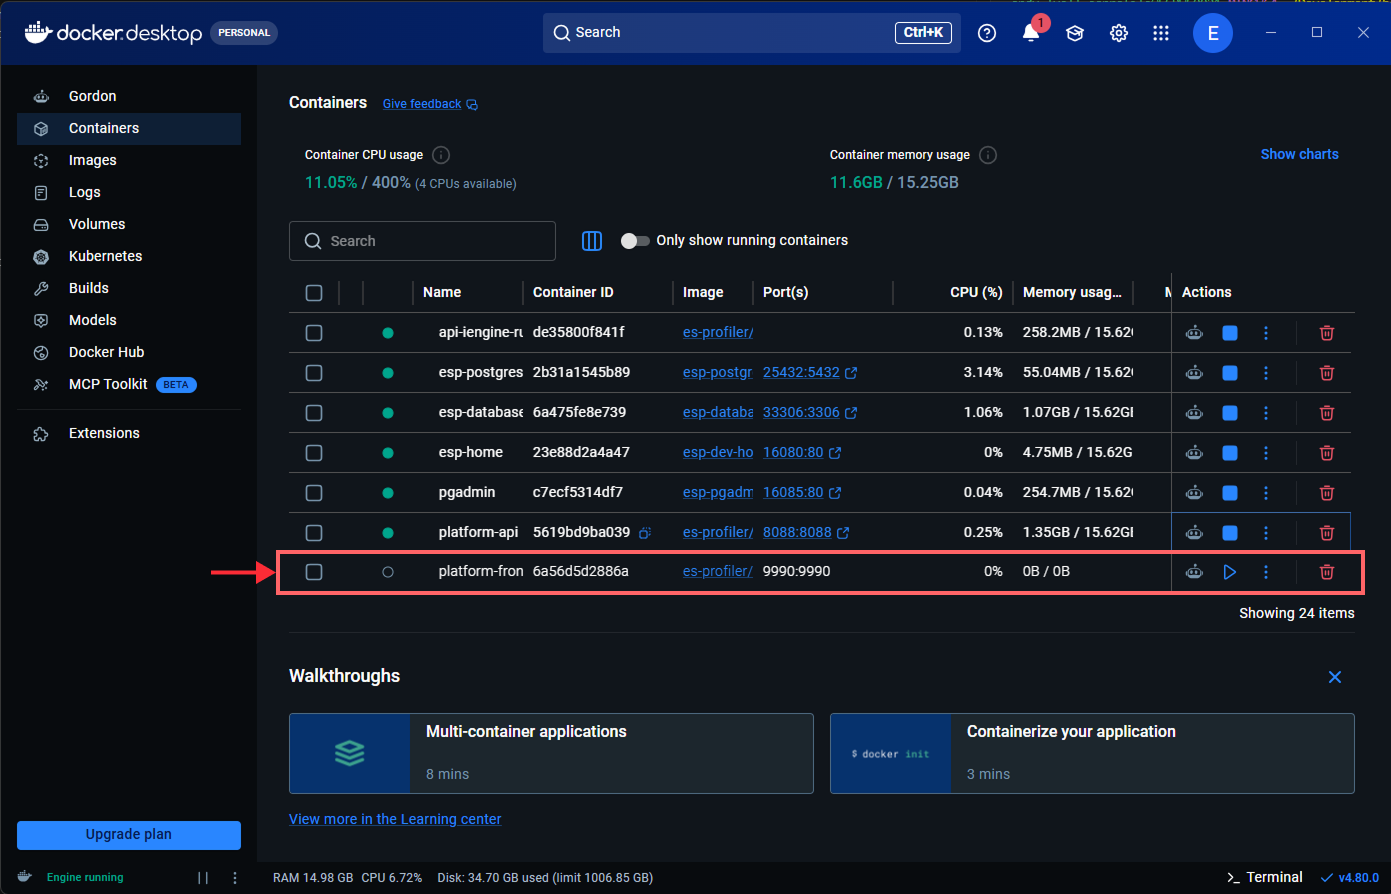
- Run
yarn run devand navigate tohttp://127.0.0.1:9990/ - You can then use the platform served from your local repository.